Troubleshooting
Facing the reality of solid limits, users may suggest there are technical problems when this is not the case. Be suspicious if the user insists the computer should be returned without much troubleshooting effort.
The Sentinel Gaming System Pro and Mini Models contain two interconnecting computer systems - a high performance Windows 10 system and a Linux system to enforce security. It has many built in diagnostic and recovery features to aid in resolving the most common technical problems, including a complete Windows 10 failure. The following sections provide guidance on possible problems and information on how you can resolve these easily yourself. If you are unable to solve the problems by yourself, please contact Sentinel Gaming Systems Technical Support at 817-327-6140.
Display blank when system plugged in
When AC power is first applied to the system (plugged in and the rear Master Power switch is set to “1”, a black screen should appear with scrolling text followed by a splash screen and finally the Sentinel Login Screen.
Possible Causes:
1. Sentinel not plugged into AC power - check blue Power LED on front panel. It should flash when first plugged in/powered.
2. Master power switch in rear not set on ("1") - verify switch position
3. Display defective or does not support 1080p video resolution - check monitor specifications and try another display.
4. Display is not properly attached to the Sentinel HDMI or DVI output - requires the propeer cable from the primary display output of the Sentinel (HDMI or DVI-D) to the display. Sentinel DisplayPort outputs are for second and third monitors only (certain models).
5. Display is not powered or turned on - check monitor power indicator. Amber color usually indicates standby with no signal.
6. Display input source not set correctly - check monitor input source matches the cabling (DVI input or HDMI input if using DVI to HDMI cable).
7. More than 5 minutes has elapsed since last Login Screen activity - The Sentinel shuts off display output after 5 minutes of inactivity at the Login Screen. Press the Power Button to restore.
Internet or USB adapter problems reported on power up
On power up if the following screen is displayed instead of the Sentinel Login Screen refer to the reported error to identify the problem and possible solutions.
Errors Messages and Possible Causes:
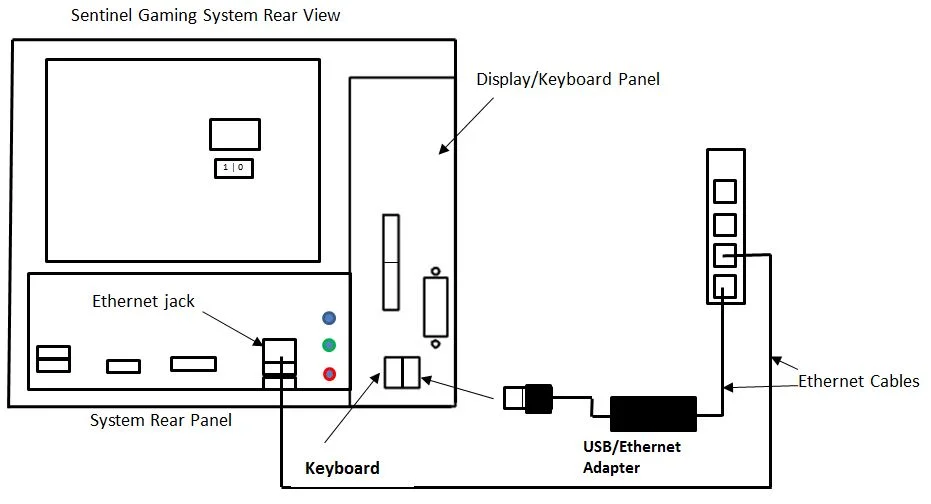
"No USB Network Adapter found!!!" - make sure the USB/Ethernet Adapter device is plugged in to the correct rear panel USB port as shown in the drawing. Unplug and plug the adapter back in and restart the system (press "r" key). The USB/Ethernet Adapter can be tested by plugging it into another computer system (Windows, Mac or Linux) to see if it is detected. Note that it will not install properly unless drivers are already loaded.
"USB Ethernet Adapter is plugged into the back of the system properly, however it is NOT properly connected to your network" - make sure the Ethernet cable is properly plugged into the USB/Ethernet adapter and the router or WIFI Extender. The green (power) and amber (network traffic) indicator lamps on the adapter should be on or flashing during power up until the Sentinel Login Screen appears or the error screen above appears.
"USB Ethernet Adapter is plugged into the back of the system properly, however it cannot reach the Internet through your network" - This suggests that the router or cable/DSL modem is not connected or operating properly. Power these devices off for 1 minute, power all on and wait 5 minutes. Press <r> to retry. If you are using the WIFI extender, make sure you have paired them properly by pressing the WPS buttons on both the router and WIFI extender.
"USB Ethernet Adapter is plugged into the back of the system properly, however it cannot reach the Sentinel remote servers through your network" - The error screen will provide an option to go to the Login Screen for User 8 without server access. Note: This does require that you have already successfully logged into the system using User 8 at least one time. This was normally done when setting up Advanced Feature Setup. Obviously, changing the User 8 password at the server will not have any effect on this type of log in.
This could happen for one of these reasons:
a. Your Internet service failed to reach our servers
b. Sentinel Gaming Systems servers or internet services are temporarily down.
c. The router connected to the Internet is blocking access to our servers.
Troubleshooting Steps
1. Check to make sure the USB Ethernet adapter is plugged in and all cables are properly connected.
2. Depress and hold the Power Switch until the screen changes. Wait for the screen to go blank and unplug the computer from AC power. Wait 1 minute and plug it back in. When the unit powers back to the Login Screen, if all the users appear then this was a temporary problem or system glitch.
If the error persists:
3. Attempt to reach our remote web site using another computer on your network or smart phone (with WIFI on). The login URL is https://www.sentinelgamingsystems.net
a. If you CAN reach the web site, then carefully check the Sentinel system for disconnected cables and the USB Ethernet adapter. Check your Internet router configuration to make sure it has not been tampered with to block access from the Sentinel to our servers.
b. If you CANNOT reach the web site, turn off WIFI on your smartphone and try again to access the web site using your smartphone. This checks an alternate internet route to the servers.
b1. If you CANNOT reach the site from your phone using mobile data, then the Sentinel servers may be down. If this happens, please wait and try again in 10 minutes to confirm this was not a temporary service outage.
b2. If now you CAN reach the site, this suggests that either your router is blocking access or your internet service provider is unable to connect to our servers. Power cycle your router, and if this does not resolve the problem, call your Internet Service Provider (ISP) and have them verify that the failure is not on their end. If your ISP is not the problem, then perform a full factory reset of your router.
Internet or USB adapter problems reported periodically
If the Sentinel works but regularly reports internet connectivity problems, your WIFI, network or internet reliability may be a problem. For much routine internet use this may not be obvious as you may simply retry your web browser or assume the web site is temporarily down.
Possible causes when using the WIFI extender:
1. Distance from WIFI extender to router too great - Move router or WIFI Extender closer together,
2. Multiple WIFI access points/repeaters in the path and poor placement of the WIFI router or extender. This is especially a problem in high density housing such as apartments and condominiums or where there are a large number of WIFI routers and extenders in close proximity. Move router or WIFI Extender closer together. Try changing the WIFI channel of the WIFI router. Look for possible RF interference sources. ATT Uverse® has been identified as a specific source of WIFI extender problems because they also use wireless to communicate with the television receivers. When the main unit is too close to the wireless television adapter, interference can occur.
3. WIFI Extender or router glitch problems - Power down the Sentinel, unplug the WIFI extender AND your WIFI router and then power them up in the following sequence: router (wait 1 minute), WIFI extender (wait 30 seconds) and finally the Sentinel. Try and pair the WIFI extender to your router again if necesssary.
Possible causes when using an Ethernet switch
With a direct connection to your router, problems may be resulting from router issues or other devices such as access points sharing the same assigned internet address. Verify your router settings to ensure this is not happening and power down or reset your router to see if the problems go away.
If problems persist
Contact your internet provider or a computer network technician for help in improving your network reliability.
Intrusion into the case or rear cover reported
This suggests that one or more of the system’s enclosure covers have been removed or attempts have been made to remove them are triggering internal sensors. The time and date of the first occurrence of the event(s) are recorded internally and will be communicated to the remote servers, which will in turn log the events and email the account holder. A tamper evident label is used to confirm that an attempt has been made to remove either the system lid or the rear panel cover.
It is possible that during transport that the sensors (that are very sensitive) are triggered. In this event, verify the integrity of the system to ensure it has not been opened and reset the alert by logging in as User 8.
User 1-8 login fails with blank screen and return to Sentinel Login Screen with no error message
If, upon a User 1-8 Sentinel login, the display goes completely blank, no fans turn on inside the system, and then within 30 seconds the Sentinel Login Screen is displayed with no error message, this suggests a hardware fault. Solution - Unplug the system for approximately 1 minute, plug back in and try again. If you continue to experience the same symptoms, unplug the system and contact Sentinel Gaming Systems Technical Support for guidance.
User 1-8 login fails with blank screen but fans turn on
Microsoft Windows® fails to load or load properly
If, upon a User 1-8 Sentinel login, the display goes completely blank and internal fans DO turn on inside the system, this suggests a failure in loading the WIndows 10 OS. While Microsoft Windows 10 is very reliable, problems can appear. Program crashes, powering down during updates, computer viruses, disk drive glitches, AC power instability and hardware failures can all cause these issues. The Sentinel Gaming System features a complete Windows® recovery drive separate from the main hard drive and can be used to repair or restore the Operating System if necessary. It is not available during normal computer use so it is protected from accidental damage or corruption.
Symptom – The screen goes blank, the computer fans power on but then power off then on repeatedly.
Solution – This suggests the computer may have been left in standby and perhaps due to a power glitch or if the computer system was unplugged, cannot resume properly. Unplug the system and leave unplugged for at least 10 minutes. Plug back in and try again.
Symptom – The screen goes blank, the computer fans power on and displays the BIOS power up message/logo. The screen may go blank again and repeat pattern of BIOS message followed by a blank screen.
Solution – This suggests either Windows® OS “Fast Boot” option has been enabled and is failing, the Windows® OS has been corrupted or there is a hardware problem with RAM memory or the hard drive/ SSD drive. The fast boot option may cause reliability problems on some systems and is set to “off” at the factory on some models. If a user changes this setting or it changes during Windows® updates, this may result in these symptoms. Unplug the system, wait at least 10 minutes, plug it back in and try again.
If this fixes the problem, check the fast boot setting and if on, turn it off:
1. Right click on Windows Start Button.
2. Select "Power Options".
3. Click on link "Choose what the power buttons do".
4. Click on link "Change settings that are currently unavailable".
5. If "Turn on fast startup (recommended) is set, click the checkbox to turn it off.
If this does not fix the problem and Windows will not load you will need to attempt to repair Windows. Click here for instructions.
User has changed Windows Administrator Password
This system provides the ability for User 8 Admin users to restore the ability to log into the Windows® 10 operating system even though the Windows 10 System Administrator has changed the password, deleted the account or otherwise locked the system owner out. There are two ways this is accomplished depending on whether the Windows® 10 System Administrator is configured to use a Windows® or local account password or if the Operating System itself has been changed. For instructions, refer to the Sentinel Gaming Systems Owner's Guide which is available from the Account Login. As a last resort the System Owner can restore the Windows OS to factory settings which will remove all programs and content installed by users.
Windows "Admin" user removed or the Sentinel Setup program deleted
If you need to rerun the Sentinel Setup and the user has deliberately removed these applications and/or account, this can be restored by following these steps:
1. Refer to the prior section to create a new Windows “Admin” account using Method number 2 if necessary.
2. Log into Gaming Mode as User 8.
3. If the Admin account no longer exists, from the Parents account, create a new user “Admin” and give it Administrative privileges. Disregard all Microsoft requests for Microsoft Account information (i.e. email address) and enter your desired password.
4. Log into the Windows System with the Admin
5. From another computer, log into the remote web interface. The current login should be displayed.
6. Click on the checkbox “Enable Recovery Drive (User 8 only)” and click Submit.
7. From the Windows Login of the Sentinel System, the Recovery Drive should appear.
8. Double click on the file Recovery.bat on this drive. You will need to confirm this with Windows®. The program will provide prompts, copy all the necessary files, initialize the installation of TightVNC and perform the Sentinel Setup.
9. The system should reset. Log in as User 1 and test out the operation of Study Mode and the Image feature.
Study Mode and/or Screen Image Fails or report errors
The Study Mode and Screen Image advanced features require that the dedicated Sentinel hardware is able to communicate with the Windows 10 display. This is accomplished through a Virtual Network Computing (VNC) connection. The networking hardware of Sentinel (USB/Ethernet Adapter) must be on the same network as the network adapter for the Windows 10 System (rear panel Ethernet jack). The Sentinel Setup program is run to configure both systems to communicate properly on the local area network. If these settings are changed or certain programs are removed or reconfigured, it is likely these features will fail. If these features fail, re-run the Sentinel Setup Program. If this does not resolve the problem, refer to the troubleshooting section of the Owner's Guide (available from the Account Login) for more information.
In order to severely discourage direct attempts to disable there features, the system can be configured to monitor the settings and to warn or shut down (default) users 1-7 after a few minutes (in any mode) if the features are disabled. Users that disabled the features know how they did it and can restore it. These settings are available from the "Account Settings” of the Account Login.

The default is “Warn” but has different options to help maintain proper operation.
None - Do not test or enforce Advanced Features operation
Warn – Send email to primary account holder indicating a failure has been detected only
Enforce – Send email and force a logout of the current user and power down the system
Enforce/Lock – Send email, force user logout/power down system and disable the current user. At that point this user cannot login until the primary account holder re-enables the user by setting the Master Enable to “Yes”.
Once set, re-run the Sentinel Setup Program to activate these settings.